

How to setup an ssh key-pair connection with a DD-WRT router in OSX
18 Jan 2016Before I even get started, I would recommend checking out this excellent post that outlines how to add additional security measures to your DD-WRT router.
Now that we’ve got that out of the way, it was actually kind of a process figuring out how to setup a public-private key pair for use with the router. I will first outline the steps in general, then cover the OSX specific steps later.
- Generate a key
- Register the key with the local machine
- Add the key to the remote machine
- Testing
- Setting up username specific for router
- Permanently add ssh key in MacOS Sierra
Generate a key
To generate a key in OSX, first open up the terminal. Then type
ssh-keygen -t rsa
It will then have you specify the filename for the key. You can just hit enter here and it will default to id_rsa. Next, it will ask for a password. Enter in whatever password you like (or you can just hit enter to not enter a password, which I don’t recommend).
At this point, your key should be generated.
Register the key with the local machine
In the terminal, navigate to wherever your key is stored. By default you can type
~/.ssh
in the terminal to navigate to where your ssh keys are stored. (Protip: in OSX and Linux, a ‘.’ before a folder or file indicates it is hidden)
If you stuck with the default filename, you should see id_rsa and id_rsa.pub. If not you should see whatever_you_named_your_file and whatever_you_named_your_file.pub
To register your key with your machine, type
ssh-add id_rsa
,replacing id_rsa as necessary.
Now, we need to register the key with your remote machine.
Add the key to the remote machine
Assuming you are still in the same directory as you were above, type
pbcopy < id_rsa.pub
which will copy the key you need to the system’s clipboard.
Paste this key in your remote machine and you should be good to go. In this case, we are referring specifically to a DD-WRT router, SO…
Login to your router’s homepage (192.168.1.1 by default) and then go to the Services tab. Within services, make sure you also have the Services sub-tab selected. From here, head on down to the Secure Shell group, and make sure you have SSHd enabled. If you do, you should see Authorized Keys. Simply paste the text you copied with pbcopy here, hit apply, and you should be good to go. (Protip: if you have done the public-private key method successfully, go ahead and disable Password Login, you don’t need it and it is a security vulnerability)
Testing
Now, from within your friendly neighborhood terminal, type
And you should be greeted by something like this
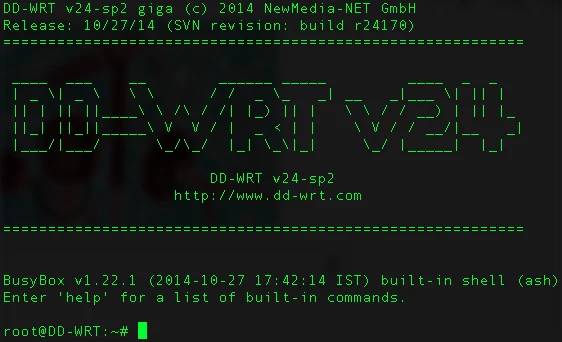
Congratulations! You have sucessfully set up a public-private key login for your DD-WRT router!
Setting up username specific for router
It’s kind of annoying having to type
every time, isn’t it?
Go back to your .ssh folder
Make a new file called config
In this file put the following
Host 192.168.1.1
	HostName 192.168.1.1
	User root
You have now set up a default username specific to 192.168.1.1 (in other words, your default username will still be used for sshing into everything else)
Now, all you have to do is type
ssh 192.168.1.1
and you’re in! Capital!